High School Chemistry Projects for Homeschool
by John Krieger
(Aliso Viejo, California, USA)
The Smelting Kit
Looking for chemistry projects? Here is a great experiment on smelting metals from John Kreiger. Click here for more science experiments for kids from John's website.
Chemistry Project:
How to Smelt Metals in a Pottery Kiln
Mankind uses metal in vast quantities to make beautiful and durable things. Most of it is not found in nature, but has to be "smelted" from special metal-containing rocks. Some of these metal-containing minerals (called "ores") are readily available in powdered form in pottery supply stores, and with the help of a pottery kiln, can easily be turned into metal.
Don't have a kiln? Find out some options for making kilns at home.
Here's how to get started with this chemistry project:
In a nutshell, you need to mix the powder with charcoal (a "reducing agent"), place it in a loosely sealed container (the "crucible"), and heat it in the kiln.
The first choice to make is which metal you want to smelt. I have successfully turned "tin oxide" powder into tin, "copper carbonate" into copper, and a mixture of the two into bronze. Both of these powders can be found under these names in the "glaze chemicals" section of the pottery supply store. For bronze, mix about six parts copper carbonate with one part tin oxide. If you reverse the proportions, you should make pewter, although I have never tried this myself. (Iron won't work in a normal pottery kiln, and other metals can be dangerous. I suggest sticking to copper and tin unless you really know what you are doing.)
The smelting container needs to be undecorated ceramic to endure the kiln temperatures, and needs to have a loosely fitting lid. It needs to be reasonably air-tight, yet still allow gasses to escape during the smelting process. I find that clay flower pots with the under-trays placed on top as lids work almost perfectly. The only drawback is that you need to seal the hole in the bottom, but that can be done easily enough with a little clay, also available from the pottery supply store. Just to be on the safe side, you should place the pot on another tray to collect anything that leaks out the hole. On the other hand, as long as you are at the pottery supply store, you could also try buying an undecorated ceramic bowl and a flat tile to use as a lid, which would cost a couple of dollars more, but would save you the trouble of sealing the hole in the bottom.
After preparing the container and filling it with the powder you wish to smelt, you need to add charcoal. Pet stores sell activated charcoal pellets for use in aquarium filters, and these work perfectly. Pour a layer over the top of the ore powder, perhaps one-quarter to one-half as much in quantity as the powder. After placing the lid on top and a tray underneath, you are ready to smelt.
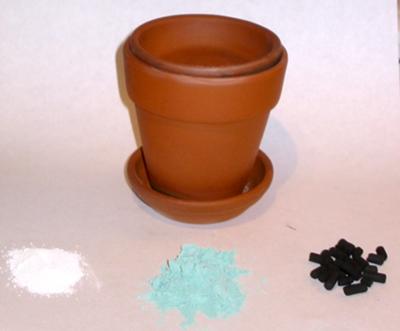
The whole smelting kit that I used is shown above.
The black pellets are the charcoal, the white powder is the tin oxide, and the green powder is the copper carbonate.
When the crucible is ready, place it in the kiln and fire it to about 2000F for copper or bronze, or somewhere around 1000F for tin or pewter, and hold it there for 20 minutes, more or less, depending on quantity. If I open the lid of the kiln (only a crack!) and listen closely, I sometimes notice a bubbling sound near the end of the smelting process. This bubbling noise seems to be a pretty good indication that reduction of ore is happening, and the cessation of the noise seems to be a pretty good indication that the smelting is done, but I haven't done a thorough series of experiments to establish the nature of the bubbling as a certainty.
After waiting for everything to cool, breaking the pot if necessary, and disposing of the leftover charcoal, you will usually find small dots and globs of metal adhering to the walls, and a few larger globs on the bottom. Sometimes a large puddle will have gathered at the bottom of the pot, but not always.
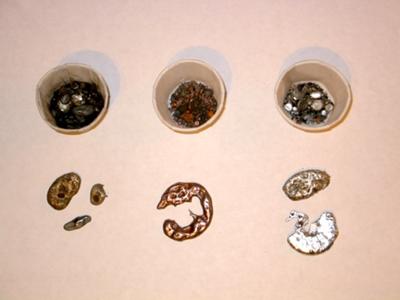
If you find no metal with leftover charcoal, the kiln may not have been hot enough long enough. If you find no metal and no charcoal, there was probably not enough charcoal to begin with, or there was too much of a draft through the crucible. If you find lots of leftover charcoal, you can use less the next time. The picture above shows a sampling of metal that I have smelted from ore powder with aquarium charcoal in clay pots. From left to right, they are bronze, copper, and tin. I used a barbeque grill brush to clean the larger bits of copper and bronze, but the tin came out already bright and shiny, for some reason.
Many thanks to John for this great high school chemistry project.
Check out his other great projects, such as How to make a Planetarium.
Go to Homeschool Activities from High School Chemistry Projects.
Lovely messages sent from visitors like you:
Oh my goodness! I am a home schooling mum of 4 and I have NEVER found a better site! Thank you so much.
Blessings, Jenny (New Zealand)
I wanted to say THANK YOU for your fabulous website. I found your website, and finally I have the confidence to take the plunge and take my daughter out of school and educate her at home, thank you, thank you.
Marina (UK)
I cannot get over how much great information and super ideas you have here. Fantastic!
Ruralmama (USA)
This is simply fabulous!! I just now found this site and I'm so excited!! The opportunities and suggestions as well as the need to inspire are exactly what I have been searching to fulfill!! I'm so thrilled to get started and even more excited to continue to explore all of the fabulous suggestions and creative ideas you have offered here!!! Thank you, thank you, thank you!
Jennifer (USA)

